
Eyeliner was first used in ancient Egypt, so with the thousands of years developments in cosmetics since then you would think that us ladies would have eyeliner sussed … right? …. Wrong! One of the biggest makeup challenges that women tell me about is that they have no idea how to apply eyeliner, and when they do they pretty much turn into a panda!
For some (and by that I mean a minority), eyeliner is a quick flick of the hand and hey presto, sexy flicks here they come. For the rest of us its quite a different story, so let me share my ‘eyeliner wisdom’.
A couple of things to consider before you start applying, we need to pick the right eyeliner for you…. here are the options:
- The Pencil Eyeliner – this is the most obvious type of liner and every girl has one. The pencil is great for all types of liner application on the lash line (where your eyelashes grow from, top and bottom) and also the waterline (the pinkish line above your bottom lashes). It is great for everyone even the most amateur of makeup wearers. The other bonus to pencil is if you make a mistake you can easily smudge it.
- The Gel Eyeliner – The gel formula has a little less flexibility than the pencil, but what’s great about it, is you can create a more intense look. It can come in a pot or a pen and both are similar to apply. It is great for a lining the lash line but I wouldn’t use it on the waterline. The only thing with a gel liner is that it can clump, and if it dries (if the product isn’t sealed properly after use) it can be a little thicker and not as smooth a consistency to apply. Best practice is to get an even amount on the brush or out of the pen and apply with less pressure, but then repeat over if needed.
- The Felt Eyeliner – this one is pretty much like a felt tip but for your face. This type of eyeliner is more for the confident makeup wearer. Purely because there isn’t much room for error or smudging, once it’s on the skin it’s on. But be warned it can dry pretty quick and the tip can be inflexible compared to say gel. It creates a very intense black line and the great thing about this is it can be really striking.
- The Liquid Eyeliner – Yes, you guessed it, liquid in a pot. This type of liner is more for the advanced makeup wearer. The liquid liner gives a more intense finish like the felt, however is more flexible as the applicator is usually a brush. To use this, you need to be really great at freehand and again once it is on the skin it is on so there is no room for error.
So now that we can make a bit of an informed choice, let’s look at how to apply the eyeliner. Before I do anything with a new eyeliner, I would always use it on the back of my hand, so that I can sense what pressure I need to use, the colour payoff I will get and the consistency of the product.
For the beginner start by tipping your head back when looking in the mirror. You will notice your eyelids will close but not fully, allowing you to see, but stretch the eyelid so that the skin across the lash line stretches smoother (unlike when eyelids are closed). It also allows you space to get your fingers and eyeliner in-between the brow bone and lash line. Another thing to consider is don’t apply mascara before liner (the stiffness of the lashes with product on can prevent smooth eyeliner application) and always have cotton tips to hand!
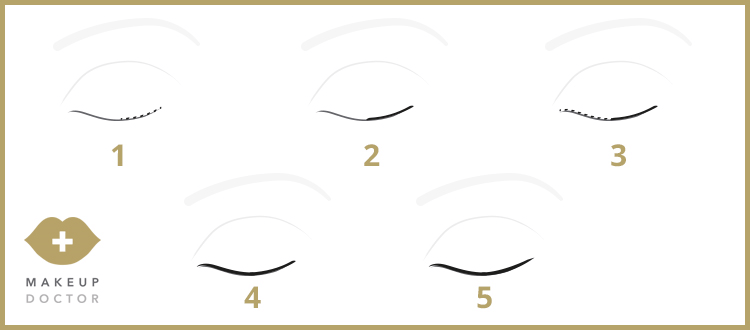
To apply use small dashes from the middle of the lash line and place more along it towards the corner where you would draw the wing…. The reason to do it in this way is so you can sense how thick a line you are getting from the product. Then join the dashes slowly together from the middle outwards. Then complete the same, small dashes, from the tear duct to the middle and then join. Remember you want to start thin at the tear duct and get thicker towards the wing. So once the lash line is complete move onto the wing. At this point you need to look down with the eye you are lining, this should look like a straight line, just extend the liner out from the lash line in a straight line at a 25-degree angle. See feature image for guide.
You may want to repeat and try this out several times before your final attempt as the more you practise the easier it really does become.
Happy eye lineng ladies!