So, the big ‘C’ word….. no not Christmas, contouring! Everyone’s doing it but lets throw all those crazy tutorials and emphasis to look like Kim Kardashian away and talk about contouring for the real woman!
Contouring, what is it? Contouring originates from the catwalk or studio. It is used hide or accentuate facial features and face shape with makeup. Perfect when you are looking at someone through the lens of a camera or from a distance. The model would often look ‘caked’ or ‘overdone’ with makeup and it would not be worn like this for everyday use as it could appear very heavy, but through the lens of a camera it would be picture perfect. Ever do your makeup and wonder why it can never be seen on a photo…. well this is the same concept.
Recently the contouring technique has been at the forefront of ‘makeup talk’ and celebrity images everywhere so much so that beauty brands have even created ‘contouring kits’. These images seem to make women look more flawless with a slimmer or sculpted effect, and because of this ‘everyone wants to do it’.
So let me explain the concept…. contouring is like shading, exaggerating the lighter areas of the face where the light would bounce and making the darker areas appear darker where the shadows would lie. The ideal face shape is oval so it allows you to shade the areas of the face to create this, and make other alterations, like making your forehead appear smaller or cheekbones higher or a straighter or slimmer nose and even making lips appear fuller.
Do you really need to buy a contour kit? Well the truth is unless you are technical with makeup or have the most flawless skin I would say no!
What you do need is a light concealer, maybe 2 shades lighter than your skin tone, a foundation similar to your skin tone and a bronzer that’s matt with no shimmer.
So for a basic everyday contoured effect that looks great to the naked eye follow the below steps:
- Prepare your skin as you usually would remove traces of makeup/dirt and moisturise
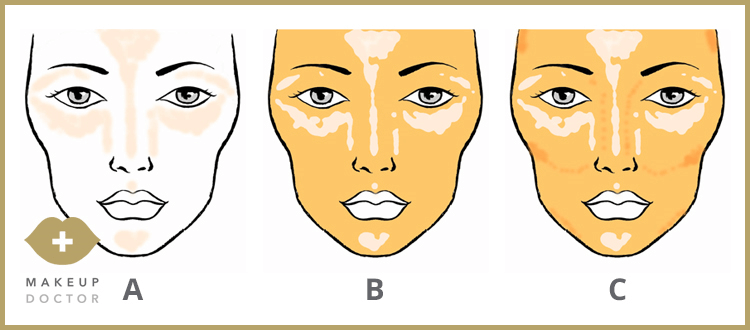
- Place the concealer in a small downwards triangle from the middle of your head all the way down the bridge of your nose, place under the brow bone and up each side of the nose all the way under the eye at least an inch down under the eye and sweep at an angle up to the temples. Also place on the cupids bow and centrally on the chin. See image A.
- Blend all of these areas into the skin with a soft stippling brush or with a blending sponge in a patting motion. The patting motions bonds the product to the skin leaving it looking even and highlighted.
- Place foundation on with the stippling brush in all the other areas of the face ….you can overlap slightly but try not to just go over the highlighted areas. If you do just repeat the application of more concealer and blend again. See image B.
- Apply bronzer with a fantail brush around the hairline then under the cheekbones from the tragus bone (the semi circle, cartilage shaped bit that sticks out from your ear) to before the corner of your lips and under the jaw line. You can also place down each side of the bridge of the nose. The key with this is to start with less product build and sweep brush repeatedly to blend and use a smaller (eyeshadow blending brush) for intricate areas like nose. See image C.

